

David Ogden, Senior Health and Science Editor.
You are standing at the bathroom mirror peeling at a thumbnail that chipped two days after you did it, wondering whether the fault was the polish, the lamp, or you. Somewhere in a drawer there are three half-used bottles of base coat and a UV lamp you bought in a January sale, and the question you actually type into a search bar at eleven at night is some version of why does my gel polish never last as long as the salon’s. It usually comes down to four things specialists check before they even look at the colour: how the nail plate was prepared, how thin each coat went on, how long and how evenly it cured, and how it eventually came off. None of those four things costs extra. A 2021 study in the Journal of Cosmetic Dermatology found that nail plate damage after repeated gel manicures was linked far more strongly to removal method than to the polish brand used, which is the single fact worth carrying into the rest of this piece.
- Curing is chemistry, not drying: gel polish sets through a light-triggered reaction, so an underpowered or old lamp is often the real cause of early lifting, not the polish itself.
- Prep decides the first week, removal decides the next six months: most of the visible damage people blame on gel polish actually comes from picking or scraping it off.
- Thin coats cure properly; thick coats trap uncured gel underneath, which shows up later as soft spots, dents, or a manicure that peels in one piece.
Why Gel Polish Behaves Nothing Like Ordinary Varnish
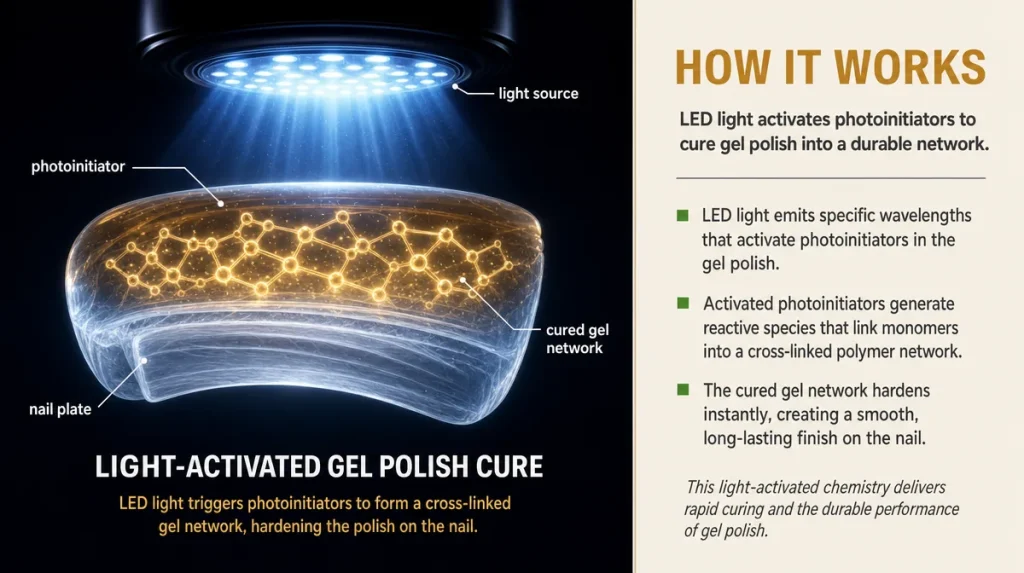
Ordinary nail varnish dries the way a puddle dries: solvents evaporate and the film left behind hardens. Gel polish does not dry in that sense at all. It cures, meaning a photoinitiator in the formula absorbs light of a specific wavelength and triggers a chemical reaction that links the gel molecules into a solid network, rather like setting a two-part resin.
This is why a gel manicure can feel completely dry to the touch within a minute under the lamp, while a regular polish left on the same nail for twenty minutes still smudges. It also explains why gel polish needs a UV or LED lamp and not simply air: without the correct wavelength of light, the reaction never properly starts, and the coat stays soft underneath however glossy the surface looks.
Specialists treat this as the starting point for judging any gel system, because every later problem (lifting, bubbling, a manicure that peels off in one sheet) traces back to whether that chemical reaction was allowed to complete.
Reading Your Own Nail Plate Before You Start
Before judging any polish, a specialist looks at the surface it is going on. Oily, flaky, or ridged nails behave differently under gel than smooth, clean ones, in the same way paint grips a sanded wall far better than a glossy one.
A simple self-test: run a clean, dry fingertip across your bare nail. If it feels slightly tacky or you can see a faint shine of natural oil, the gel has less to grip and is more likely to lift within days. Gently buffing the surface with a fine buffer (not an emery board, which is too coarse) and wiping with an alcohol-based nail prep removes that oil layer and roughens the surface microscopically, giving the gel something to hold onto.
Cuticle work matters for the same reason. Gel that sits on top of pushed-back, dry cuticle skin rather than directly on the nail plate has a weak point built in from day one, and that is usually where lifting starts first, at the base rather than the tip.
Why The Lamp Is Doing More Work Than The Bottle
Two bottles of gel polish can be chemically near-identical and still perform completely differently depending on what they are cured under. UV lamps and LED lamps work on the same principle but at different wavelengths and intensities, and wattage varies considerably between a budget travel lamp and a salon unit.
An under-powered or ageing lamp (bulbs do lose output over months of use) can leave the outer surface of the gel looking set while the layer closest to the nail stays only partly cured. That partly-cured gel is softer, more prone to denting, and more likely to separate from the nail in one piece during removal, taking surface layers of the nail plate with it.
As a working rule, cure each coat for the full time stated for your specific lamp’s wattage, not a guessed shorter version, and replace LED bulbs roughly every six months if you manicure often. If a manicure consistently dents easily on day one, under-curing is the first thing worth suspecting, well before blaming the colour coat.
Thin Coats Versus Thick Coats: The Mistake Nearly Everyone Makes
The instinct when a colour looks patchy is to apply it thickly to get full coverage in one go. With gel, that is close to the opposite of what you want. A thick layer cures unevenly: light reaches the top quickly but struggles to penetrate fully to the base, leaving an under-cured layer sealed beneath a hard shell.
Specialists compare this to painting a thick coat of varnish onto wood: the surface skins over while the layer underneath stays tacky for far longer, and the finish eventually cracks or peels because the two layers cured at different rates.
Two or three genuinely thin coats, each fully cured before the next goes on, almost always outlast one thick coat, even though it looks like more effort. Capping the free edge, meaning drawing the brush over the very tip of the nail on each coat, also matters more than most home manicurists realise, since the tip is the point of most daily contact and the first place a coat tends to lift from if left bare.
The Removal Step That Decides How Your Nails Look In A Month
This is the stage specialists return to again and again when assessing long-term nail health, because it is where most visible damage actually happens, not during application. Gel polish is designed to be dissolved off with acetone, not peeled or picked off.
Peeling pulls away the top layers of the nail plate along with the gel, since the cured gel bonds more strongly to the nail’s surface cells than those cells bond to the layers beneath them. The result, over repeated manicures, is a nail plate that looks thin, ridged, or flaky, which many people then blame on “gel damage” generally rather than on the specific act of peeling.
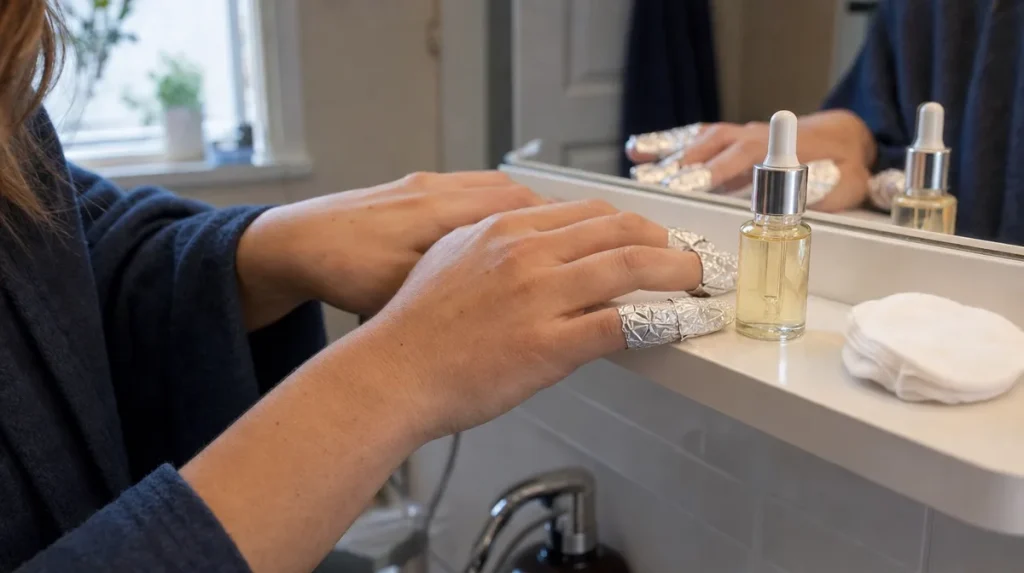
The soak-off method, cotton pads soaked in acetone, wrapped in foil, left for around ten to fifteen minutes, then gently eased off rather than scraped, removes the gel chemically instead of mechanically. A light buff and a rich cuticle oil afterwards helps the nail plate recover its moisture balance, which matters more in winter, when central heating and damp outdoor air both draw moisture from skin and nails faster than cold alone would.
What Actually Predicts Chip Resistance, And What Is Just Marketing Language
Packaging often promises results in weeks, with words like “long-wear” or “salon strength” doing a lot of unverified work. Specialists look past the wording to three things that genuinely affect how long a manicure lasts: the base coat’s bonding ingredients, the thickness and evenness of each cured layer, and how the top coat seals the free edge.
A well-formulated base coat contains adhesion promoters designed to bond chemically with both the nail plate and the colour gel above it, acting as a kind of primer coat. Marketing claims about diamond dust, biotin additions, or “nail-strengthening” colour gels sound persuasive but have little independent evidence behind them for a coating that sits on top of the nail rather than inside it; nail strength itself is governed by hydration, diet, and the health of the nail matrix under the skin, not by a top coat.
If you want a genuinely useful comparison point, consumer-testing resources such as Which? have previously published lab-scored comparisons of gel kits that look at wear time and ease of removal rather than marketing copy, which is a more reliable way to judge a format than reading the bottle.
Judging The Finished Manicure Like A Specialist Would
A specialist assessing a finished gel manicure checks four things in order, and you can run the same checklist at home. First, the surface: it should be glass-smooth with no tacky residue, which would indicate under-curing. Second, the edges: run a fingernail gently along the tip and side walls; any ridge where the gel meets bare nail suggests the coat was too thick or not capped properly.
Third, flexibility: very lightly flex the nail tip. A properly cured gel should have slight give without cracking; a gel that feels glassy and brittle right to the free edge is often over-cured or applied over too-thin a base, which makes chipping more likely under everyday knocks rather than less.
Fourth, and easiest to check days later, is how it ages: a well-executed gel manicure should grow out evenly at the cuticle line without lifting at the base first, since lifting there usually signals a prep issue rather than a product fault. Comparing a first-week photo against a three-week photo of the same hand, taken in similar light, is a useful private habit if you manicure regularly and want to work out which step in your own routine needs adjusting.
Key Takeaways
Gel polish cures through light-triggered chemistry, not evaporation, so lamp wattage and cure time matter as much as the formula. Most of the long-term damage people associate with gel comes from peeling it off rather than soaking it off properly. Thin, fully cured coats with a capped free edge consistently outlast thick, rushed ones, whatever the bottle promises.
A Quick Checklist Before Your Next At-home Gel Manicure
- Buff away surface oil and wipe with nail prep before applying base coat
- Apply thin coats only, capping the free edge each time
- Cure each layer for the full time stated for your lamp’s actual wattage
- Replace LED bulbs roughly every six months with regular use
- Soak off with acetone and foil wraps; never peel or scrape
- Apply cuticle oil after every removal, especially through damp winter months
- Check the finished manicure for tackiness, ridges at the edges, and even flexibility
This article is general information and does not replace advice from a qualified dermatologist or nail technician.
Individual results vary depending on nail health, technique, and equipment used.