

Priya Nair, Staff Writer.
It is a familiar scene on a damp Tuesday morning: the ends are already crisping into frizz while the roots sit cool and wet underneath. Ten minutes later, arm aching, the hair still looks half finished and somehow frazzled at once. Most of us learned to dry our hair by trial and error, usually from whatever dryer happened to be under the sink, and we have carried the same habits for years without questioning them. Here is the useful bit before anything else: the single biggest driver of frizz and breakage is not heat itself but how long the hair sits at a given temperature. A 2019 study in the International Journal of Trichology measured cuticle damage at different heat exposure times and found that duration mattered as much as peak temperature. That one fact changes almost everything about how a dryer should be chosen and used, and it is where this guide starts.
- Airflow control matters more than wattage: a dryer that lets you separate heat from speed does more for your hair than a bigger number on the box.
- Damage accumulates from exposure time, not just temperature: shorter passes at a sensible heat beat long blasts at any setting.
- Technique fixes more frizz than any gadget: section size, nozzle angle and a final cool shot outperform most add-on claims.
Why Your Hair Dries Patchy, Not Evenly

Hang a wet towel over a radiator and watch what happens. The section draped closest to the heat dries first, the folded middle stays damp for ages, and if you never shift it the pattern never corrects itself. Hair behaves in a similar way under a dryer’s nozzle: whichever section sits directly in the airstream dries fastest, while hair tucked underneath or near the scalp, which is already warmer and more insulated, lags behind. The practical fix is simple and almost nobody does it by default: work in sections, starting underneath at the nape and working upward, rather than attacking the whole head from the crown. Clip the top layer out of the way while the lower layers dry. This alone, according to guidance the Good Housekeeping Institute has published on heat styling generally, reduces the uneven drying that leads people to over-dry the ends while chasing damp roots. The self-test here takes ten seconds: run damp fingers through a section you believe is dry. If it still feels cool rather than warm to the touch, it has more moisture left than the surface suggests, and another pass at a lower heat will finish the job more gently than a longer blast at high heat ever would.
Wattage: What The Number On The Box Actually Buys
Shoppers are taught to treat wattage as a proxy for quality, so the instinct in a Boots or Superdrug aisle is to reach for the highest number available. Wattage mostly buys speed, not finish. A higher-wattage motor moves more air and dries hair faster, which matters if you are drying thick or long hair before work, but it does nothing on its own to protect the cuticle. What actually determines whether that air is doing gentle or harsh work is the heat setting paired with it, and crucially, whether the dryer lets you adjust heat and speed independently. A dryer fixed at one blasting setting forces a trade-off: either you dry quickly at high heat, or slowly at a heat low enough to be kind to the hair. A dryer with separate heat and speed dials lets you run high airflow at a moderate heat, which is the combination that dries fast without cooking the cuticle. For fine or colour-treated hair, that independence of controls matters more than almost anything printed on the box. For very short or very fine hair that dries in under two minutes regardless, wattage barely matters at all, and spending more for it is money better kept for something else.
Reading Heat And Speed Settings Without Guesswork
Most dryers offer three heat settings and two or three speeds, and most people use the same combination every single day regardless of what their hair needs that morning. The mechanism worth understanding is this: heat opens the hair’s outer cuticle layer so moisture can escape, while airflow is what actually carries that moisture away. Too much heat with too little airflow leaves the cuticle open and vulnerable for longer than necessary. A sensible default for most hair types is medium heat with high speed for the bulk of drying, dropping to low heat only for the final pass near the scalp, where skin sensitivity and finer baby hairs both warrant a gentler setting. The common mistake is doing the opposite: starting on high heat close to the scalp, where it is uncomfortable, then easing off exactly when the ends, which are the oldest and most fragile part of the hair, need the most protection. A quick check while drying: if you can comfortably hold the dryer six inches from a section for a continuous count of five without flinching, the heat is in a reasonable range. If you cannot, it is too hot for that distance, full stop.
The Nozzle And The Diffuser: When Each One Earns Its Place
A concentrator nozzle narrows the airflow into a focused stream, which is what gives a blow-dry its smoothness: directed air encourages the cuticle to lie flat in one direction, the way stroking a cat’s fur the right way leaves it sleek rather than ruffled. For straight or smoothed styles, a nozzle angled downward along the hair shaft, never upward against it, is doing the actual smoothing work that a flat brush alone cannot. A diffuser does the opposite job. It spreads air out gently to dry curls or waves in place without disturbing their pattern, cradling sections rather than blasting them. Anyone with natural texture who dries with a plain nozzle is often fighting their own curl pattern without realising it, which is a common and entirely avoidable source of frizz. The honest answer to which attachment to buy is both, if your hair type or styling changes with the season. For straight-haired readers who never diffuse, the nozzle alone is enough and a diffuser is clutter. For wavy or curly hair, the diffuser typically does more for frizz reduction than any serum applied afterwards, since it is addressing how the moisture leaves the hair in the first place rather than coating the result.
A Drying Method That Actually Cuts Frizz
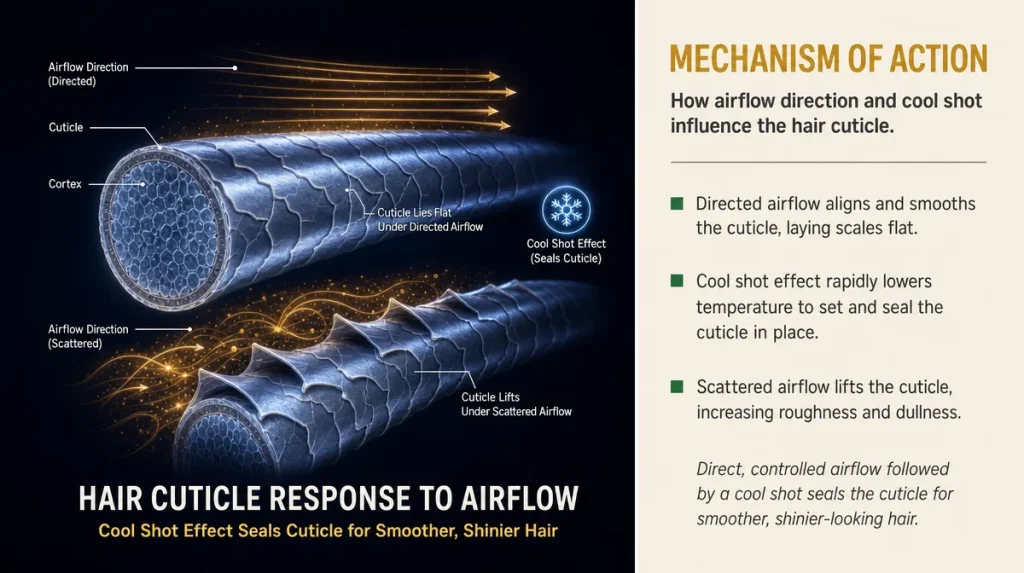
The method itself matters more than the dryer doing the work, and it costs nothing to change. Towel-dry first using a gentle squeezing motion rather than rubbing, which roughs up the cuticle before heat is even involved. Comb through with a wide-tooth comb while hair is still damp, never dry, since dry hair snaps more readily under tension. Section the hair into no more than four or five parts and dry each on medium heat and high speed, keeping the dryer moving rather than holding it still on one spot. A stationary nozzle concentrates heat on a single patch of cuticle in a way that moving air never does. Finish each section with a short burst of the cool shot button, which closes the cuticle back down and is the single most underused feature on most dryers. The whole pass should take minutes, not quarter-hours. If drying is regularly taking much longer than that, the issue is usually technique or a tired motor rather than hair that is simply stubborn.
Ionic, Ceramic, Tourmaline: What Matters And What Is Marketing
Packaging leans heavily on these words, and they are not meaningless, but they are often oversold. Ceramic heating elements distribute heat more evenly than cheap metal coils, which genuinely reduces hot spots that can scorch a section of hair while the rest stays untouched. That part is worth paying attention to. Ionic technology is claimed to reduce frizz by breaking down water droplets faster, and some manufacturer-funded testing supports a modest effect on drying speed. Independent comparative testing, of the kind Which? has published on household appliances generally, has been more cautious about frizz-reduction claims specifically, noting that technique and attachment choice tend to outweigh ionic output in practice. The mistake worth avoiding is choosing a dryer purely on a feature list rather than on whether it has stable, independent heat and speed controls, a nozzle that fits securely, and a motor that does not sound strained on its highest setting in the shop. Those three things, checked by hand before buying, tell you more than any acronym on the box.
A Thirty-second Test For Heat Damage Before It Shows
Damage from heat styling tends to be invisible for months before it suddenly looks like a problem, usually as breakage around the face or a general dullness that no amount of conditioner seems to fix. By the time it is visible, the cuticle damage has typically been building for a while. To check early, take a single dry strand from a brush and stretch it gently between two fingers. Healthy hair has a small amount of give before it resists. Hair that snaps immediately with no stretch, or that feels rough and matte rather than smooth along its length even straight after washing, is showing early heat stress. Another marker: hold a section up to daylight near a window, since bathroom lighting flatters almost everything. Overly porous, heat-damaged hair often looks slightly frayed or feathered along the ends rather than having a clean, blunt edge, even on hair that has not been cut in a while. Catching this early usually just means lowering the everyday heat setting and adding the cool shot step, rather than any drastic change.
Signs It Is Time To Replace, Not Repair
Dryers wear out in ways that are easy to miss because the decline is gradual. A motor that once dried a full head in five minutes creeping up to twelve over a year or two is not a sign your hair has changed, it is a sign the motor has lost power. A faint burning smell on the lowest heat setting, rather than only the highest, is worth taking seriously and is reason enough to stop using it rather than waiting for it to worsen. A frayed cord, a casing that gets uncomfortably hot to hold, or a nozzle that no longer clicks on securely are all practical safety signals rather than cosmetic ones. The British Beauty Council has referenced general appliance safety guidance in its wider policy work on the beauty sector, and the same common sense that applies to any electrical appliance in a damp bathroom applies here: if in doubt about safety, stop using it. For most households, a well-used dryer earns its keep for several years before any of this becomes relevant, and replacing on a schedule rather than on actual signs of wear is unnecessary. Boxing Day sales are, for what it is worth, when many readers find dryers on offer at a genuine reduction, which is worth bearing in mind if a replacement is already overdue rather than urgent.
Key Takeaways
The dryer itself matters less than most advertising suggests. Independent heat and speed controls, a secure nozzle, and a motor that does not labour on its highest setting will serve most hair types well regardless of the brand on the box. What actually prevents frizz and damage is sectioning the hair properly, keeping the dryer moving, working on a moderate heat rather than the highest available, and finishing with a cool shot to close the cuticle. Heat damage builds quietly over weeks, so a quick stretch test on a stray strand now and then catches problems long before they show up as breakage.
A Quick Checklist Before Your Next Dry
- Towel-dry gently and comb through with a wide-tooth comb while hair is still damp
- Section hair into four or five parts and start at the nape, not the crown
- Use medium heat and high speed for the bulk of drying, lower heat only near the scalp
- Keep the dryer moving rather than holding it on one spot
- Finish each section with a short cool shot
- Use a nozzle for smoothing, a diffuser for curls or waves
- Check for a stray strand’s stretch and a smooth, unfrayed edge every month or so
This article is general information and does not replace advice from a qualified professional.
Individual results vary depending on hair type, condition and styling habits.